← All Tutorials
Exchange On-Premises Restore – Import .pst files into mailboxes with Iperius Backup
Iperius allows a simple and fast restoration of the Exchange Server (On-Premises) mail backup, offering restore functions that range from the targeted recovery of a single .pst file on a specific mailbox, up to the complete restoration of multiple mailboxes from .pst files generated in previous backups.
Below we will see the procedure for restoring .pst files (created by previous backup operations) on a single mailbox or on a group of mailboxes belonging to a multiple backup performed with Iperius.
Note: Before performing a backup with Iperius, make sure you have correctly configured the necessary permissions by following our guide:
Configuring Exchange permissions
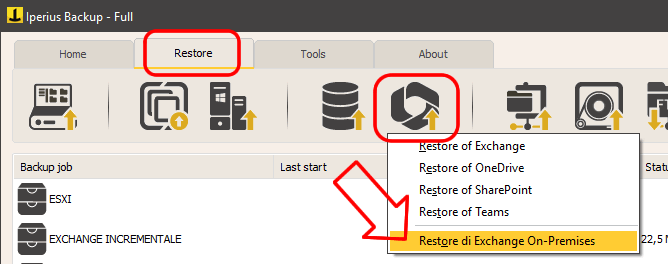
From the main Iperius window, go to the “Restore” menu and click on the Exchange On-Premises restore button:
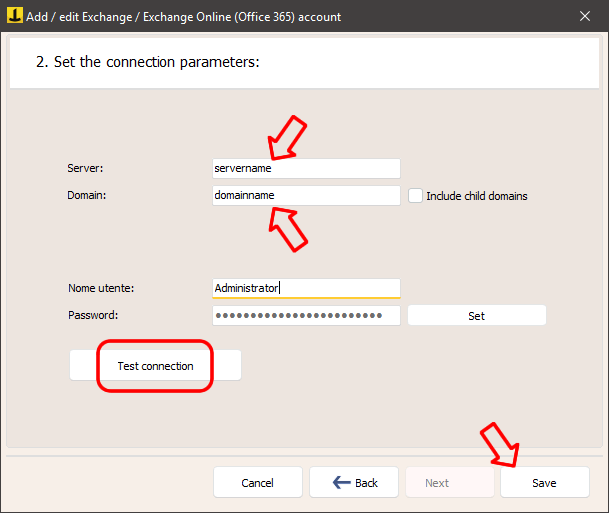
A window will open to configure the Exchange restore. The first operation to perform is to add an Exchange account (with administrative permissions) to provide Iperius with the necessary permissions to connect to the mail server and perform the restore.

Creating an Exchange account must be done through a simple wizard (it is the same window used for Microsoft 365 accounts). Enter a name for the account, select the connection type ” Exchange On-Premises ” and click “Next” to specify the server address, domain name and credentials:
After saving the account you can go back to the main restore window and proceed with the other settings
Restoring a single mailbox
To do this, select “Restore a single mailbox” and enter the following information:
- The path to the .pst file to restore (in UNC format, even if the file is on the same server). Make sure that the EXCHANGE TRUSTED SUBSYSTEM service has read permissions on this folder.
- The name of the destination mailbox (this is automatically filled in, but can be changed by clicking “Update”).
- The name of the folder within the mailbox where the restored data will be saved.
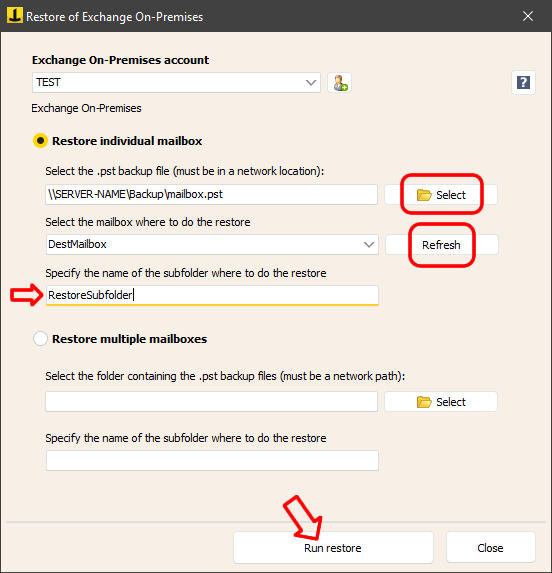
Once everything is configured, click “Run Restore” to start the process.
Recovering multiple mailboxes
This operation allows you to automatically associate each .pst file with the corresponding mailbox. After configuring the Exchange account, select the “Restore multiple mailboxes” option.
Select the folder containing the .pst files or enter the UNC path manually. Make sure that the EXCHANGE TRUSTED SUBSYSTEM service has read permissions on the folder.
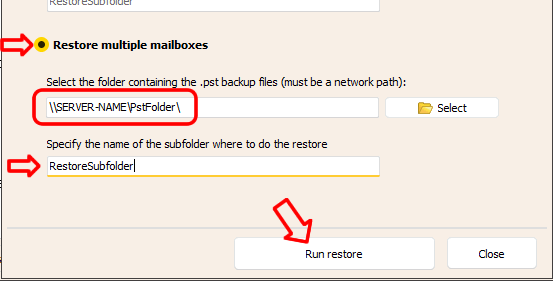
Indicate the folder within the mailbox where the messages will be imported.
Finally, click on “Run Restore” to start the process.
Read also: Guide to Exchange Backup and Export Emails to .pst File
For any questions or doubts regarding this tutorial,
Contact us