← All Tutorials
Monitoring backups with Iperius Console RMM – Installation and configuration
Iperius Console is a centralized platform that allows you to easily manage and monitor all backups made through Iperius Backup . In addition to backup control, Iperius Console also has important RMM features, such as monitoring the health status of systems and their hardware and software configuration (CPU, RAM, hard disk space, presence of antivirus and firewall, etc.). Monitored computers can be organized into workgroups with specific permissions and access to the Console can be protected by 2-factor authentication (2FA).
As for Iperius Backup, from Iperius Console you can start and schedule backups remotely with just a few clicks, in addition to the possibility of checking the backup results and the presence of any errors.
Finally, Iperius Console supports remote access to monitored computers via Iperius Remote , the remote desktop software of the Iperius suite.
Below we will explain in detail the three fundamental steps to connect a computer to Iperius Console:
1) Installation of Iperius Console Agent , the essential component for communication between the console and the products of the Iperius suite;
2) Configuration of Iperius Backup notifications to the Console ;
3) Access to the web interface available on https://console.iperius.com .
Iperius Console licenses have extremely competitive costs (starting from just over €3 per month for 20 monitored computers) and can be purchased based on the number of computers you wish to monitor: Buy Iperius Console .
1 – Installing Iperius Console Agent
Before proceeding, make sure you have installed the latest version of Iperius Backup.
For an installation on multiple devices at once ( mass deployment with GPO) using the MSI setup , go to this section .
To install, you can download the setup file from the link below and run it to start the installation wizard ( https://www.iperiusconsole.com/download/SetupIperiusConsoleAgent.exe ) or launch the download and installation from Iperius Backup, directly from the “General Settings” menu, under “RMM Console”, ” Connect this computer to the Console “.
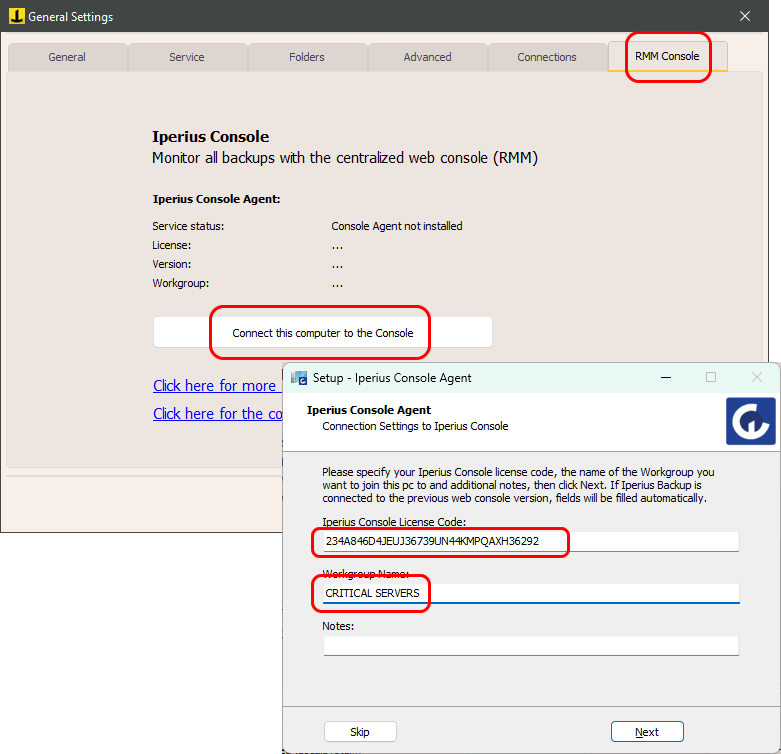
At the end of the installation phase, a section will be displayed that allows the immediate configuration of Iperius Console Agent before it is started. In case of an existing connection between Iperius Backup and the Console, the program will automatically recover the data relating to the license code, the workgroup and the notes, filling the configuration boxes and speeding up the installation and configuration of the agent as much as possible.
Once you have entered the license code and the workgroup name, click on next to complete the installation (in the last window it is advisable to leave the “Launch Iperius Console Agent” option checked).
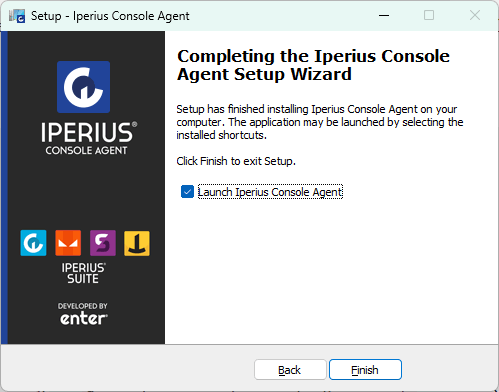
In this way Iperius Console Agent will start immediately and, in case of configuration performed via setup, it will connect directly to the Console, showing the message of successful connection to the workgroup that was specified.

If the configuration is not done during setup, when the program starts it will show the “Iperius Console License” and “Workgroup Name” boxes both empty and editable, in addition to the “Computer Status” and “Service Status” entries which will respectively indicate the “Not Connected” and “Not Installed” states. In this case, simply enter the license code and the workgroup name in the respective text boxes and then click on ” Save and Connect ” to directly connect the computer to Iperius Console.
In the “Settings” tab of the Console Agent you can set a possible proxy and other options
Let’s now move on to the next step, which is enabling Iperius Backup to send backup notifications to Iperius Console.
2 – Enabling Console notifications in Iperius Backup
Once the Console Agent is installed, started and connected to the Console, to enable notifications simply select, in the “Summary” tab of a backup job, the option shown in the image below:
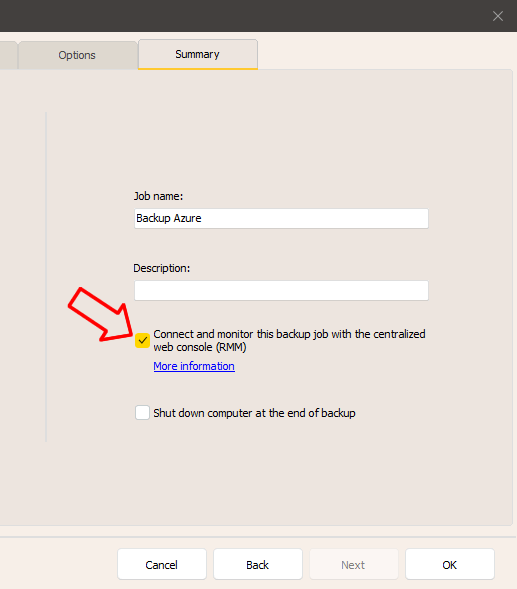
When this option is checked for a backup operation, Iperius will communicate to the Console all the information relating to the outcome of the backup itself, every time it is executed.
At this point we move on to the last phase of our guide, that is, accessing the Iperius Console web interface.
3 – Interfaccia di Iperius Console
Vai su https://console.iperius.com ed effettua il Login, inserendo le credenziali che ti sono state inviate via email al momento dell’acquisto della licenza Iperius Console.
Nell’immagine seguente puoi vedere la dashboard iniziale della Console:
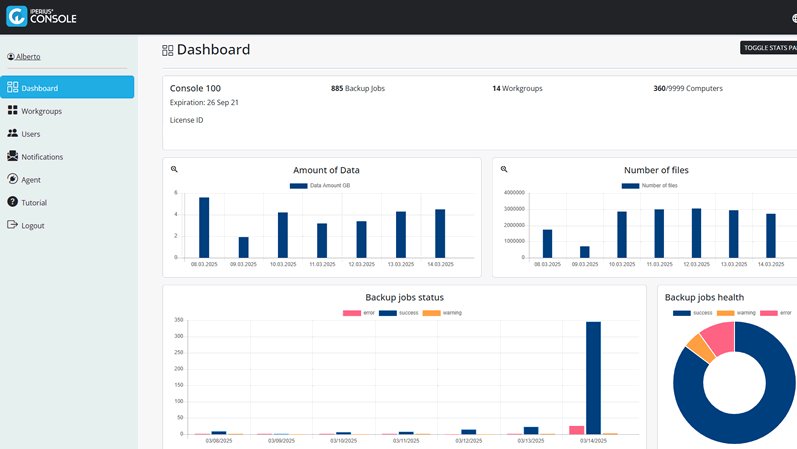
Nella Dashboard è possibile visualizzare le varie statistiche riguardanti i gruppi di lavoro creati (Workgroup) e i PC collegati alla console, nonché la lista degli ultimi backup eseguiti e degli ultimi backup pianificati ma che hanno saltato le regolare esecuzione.
In Workgroups è possibile sfruttare le numerose funzioni di monitoring e controllo remoto di cui Iperius Console dispone, fra cui l’esecuzione di backup e l’aggiornamento di Iperius Backup da remoto, l’esportazione in formato XLS della lista dei backup, l’attivazione delle notifiche push sull’app mobile della Console, degli avvisi relativi ai backup e allo stato di salute dei sistemi, la modifica degli orari di pianificazione dei backup e ovviamente la visualizzazione completa degli esiti di tutti i backup per cui sono attivate le notifiche alla console.
Quando clicchi su un workgroup, vedrai una lista di tutti i computer appartenenti ad esso:
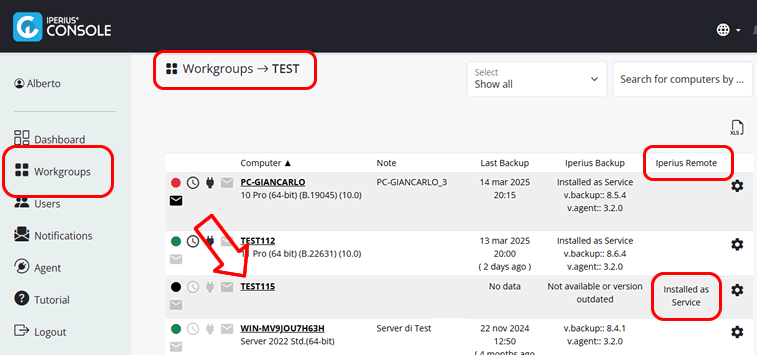
Se clicchi sul nome di un computer, vedrai tutte le informazioni ad esso relative, inclusa la lista di tutte le operazioni di backup in esso configurate.
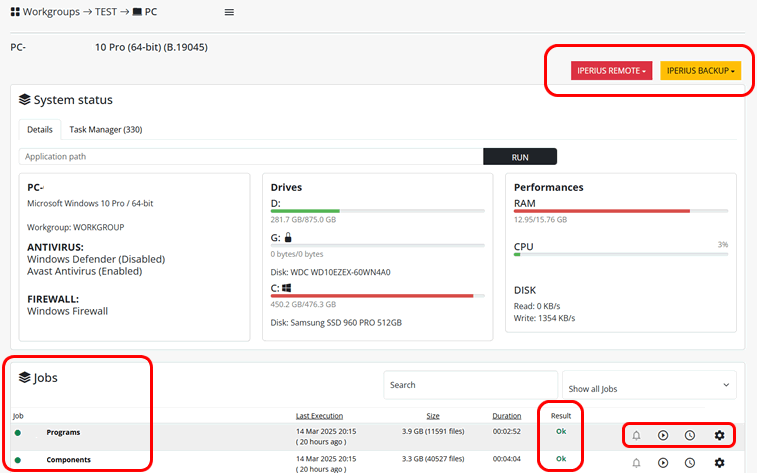
Su ogni computer possiamo effettuare varie operazioni su Iperius Backup mediante l’apposito pulsante (possiamo aggiornare Iperius Backup o il Console Agent da remoto) o accedere in remote desktop al computer monitorato mediante il pulsante “Iperius Remote”.
In basso puoi vedere la lista delle operazioni di backup configurate su quel computer e diverse informazioni ad essere relative, come la data e ora di esecuzione, la dimensione dei dati copiati e il risultato. Per ogni operazione di backup puoi vederne i log, modificarne la pianificazione, eseguirla manualmente o abilitare le notifiche push sull’applicazione mobile.
Nota bene: per poter visualizzare correttamente tutte le informazioni relative ad un computer monitorato e alle sue operazioni di backup, è necessario aver eseguito almeno una volta un backup da quel computer, con relativa notifica alla Console.
In “Users” you can modify or add various types of users, who will therefore have different permissions: “User” and “Power User” can only see the workgroups that administrators allow them to see; a “Power User”, compared to a simple “User”, can create workgroups (but not delete them), start backups and change their schedule, update Iperius Backup both for a single computer and for all computers in a workgroup and generate the Console Agent setup. Administrators can see all workgroups and perform any operation on the console.
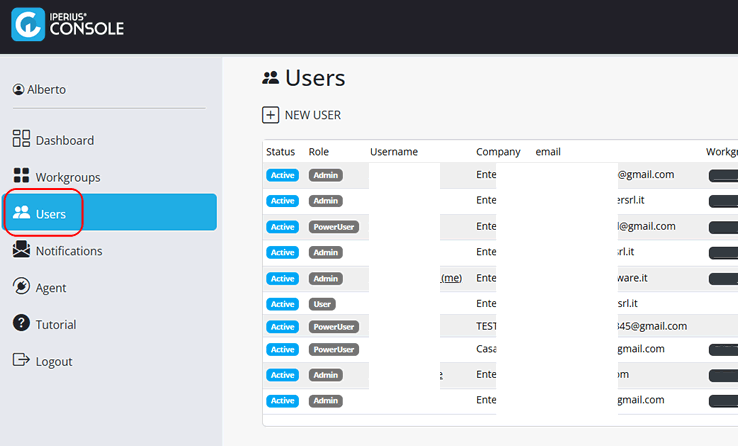
Once a user is created, from their profile you can enable two-factor authentication (2FA) for access to the Console. Two-factor authentication is always recommended, for maximum security.
In the “Agent” section you can create the Console Agent MSI setup file, to install it on the various computers to be monitored. The MSI setup also allows the mass installation (mass deployment via GPO) of the Console Agent.
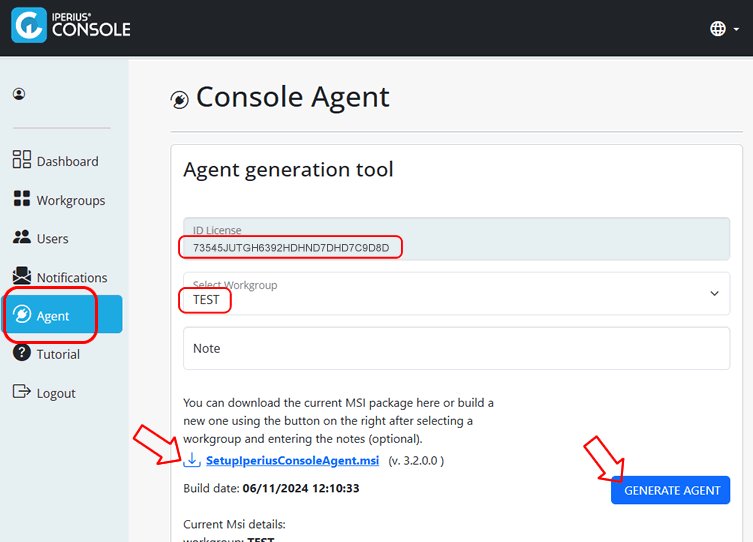
To generate the MSI setup you must specify a workgroup name. The license key is automatically included. When you run the MSI setup on a computer, it silently installs and starts the Console Agent, which then connects the computer to the Console. Then, when a backup is performed on that computer, information about the backup and its result will be automatically sent to the Console.
In “Notifications” you can specify an email address to which the Console should send (weekly) email notifications about the health status of the systems and the results of backup operations.
For any questions or doubts regarding this tutorial,
Contact us