← All Tutorials
Restore of a Drive Image Backup (system recovery) with Iperius
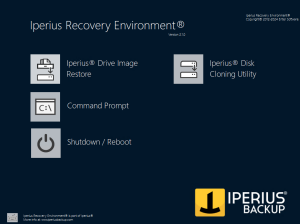
With Iperius, you can create a recovery disk (USB or an ISO file to burn) containing the boot system Iperius Recovery Environment®, which allows you to boot a machine and restore a disk image backup created with Iperius (file .VHD or .VHDX). This functionality allows you to perform a bare-metal restore, a true disaster recovery even on different hardware, without the need for any Windows installation disk, just the Iperius recovery disk. To learn how to create a recovery drive, read the dedicated tutorial. Also see: Disk image backup, disk cloning and P2V with Iperius Once the recovery disk is created, insert it into the machine you want to boot, i.e., the one where you want to restore the backup (to boot the machine from a USB device, you may need to change some settings in the BIOS or boot menu). The machine will boot with Iperius Recovery Environment®, and its interface is shown below.
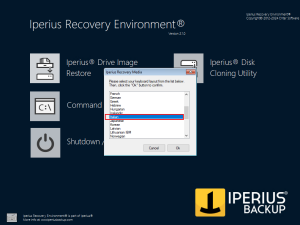
NB: Before starting the Iperius Backup recovery interface, it is important to select the current keyboard layout to avoid the connected keyboard not being mapped correctly in the software. To do this, simply click on the keyboard icon at the bottom left and choose the keyboard layout (the default is set to US: US), confirming with the OK button (see the image below).
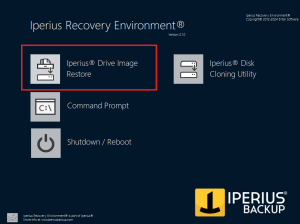
After correctly setting the keyboard layout, you can start the recovery program by clicking on the “Drive Image Restore” button (as shown below):
Let’s now look at the steps in the process of restoring the Iperius disk image backup.
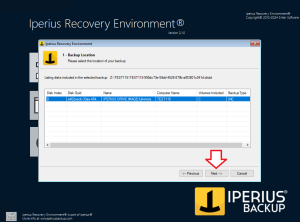
1) Select the Drive Image backup path
After launching the interface, you need to select the backup path, which should contain one or more .VHDX or .VHD files (virtual hard disks) and a .idi or .idicbt file (the configuration file with the necessary information to restore a full or incremental backup). Start by choosing the type of path where the image is located, using one of the two available options (see the image below):
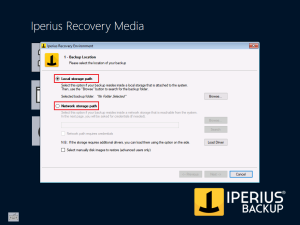
1a) Local Path: corresponds to a local path of the machine (hard drive, USB stick, or any mapped device as a drive);
2b) Network Path: corresponds to a network path accessible from the machine (NAS, shared folder, etc.);
1a) Select from a local path
Let’s start with the local path. After selecting “Local Storage Path,” click “Browse” and use the folder tree to find and select the .idi or .idicbt file present in the backup folder to restore (see the image below).

To confirm, simply click the OK button highlighted above. The path will be scanned, and if one or more backups are found, a confirmation message will appear (see the image below, right side). If no backups are found, a warning message will appear (see the image below, left side).
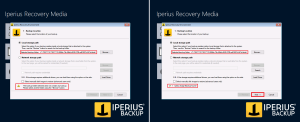
If backups were found, we can proceed by clicking “Next.”
1b) Select from a network path
If the backup is located on a network path, select “Network Storage Path” and enter the path of the folder containing the .idi file (you can also use the “Browse” button to view the network devices). Click “Search” to start scanning (see the image below):
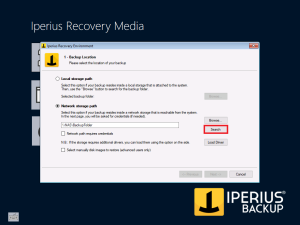
Again, after the scan, a confirmation message will appear if backups were found; otherwise, we will see a warning. The “Next” button will be enabled only if backups are found.
Setting network credentials: If the network path requires login credentials, select “Network path requires credentials” and, after clicking “Search,” enter the necessary credentials in the window that will open (see the image below).

Once the correct path is selected, click “Next” to continue.
2) Select the backup to restore
One or more backups found in the selected path will be displayed (see the image below).
Each row corresponds to a backup, with its main information such as the backup operation name, computer name, included volumes, and backup type. Select the desired backup and click “Next” to continue. If the backup is Full or Patching, proceed to section 3. If the backup is incremental or differential, choose which version to restore.
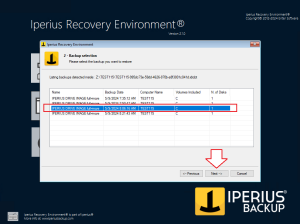
Choose the backup to restore and click “Next” to continue.
3) Select the restore mapping
In the restore mapping window, we need to assign a hard drive to each .vhdx or .vhd file from the backup to restore (see the image below).
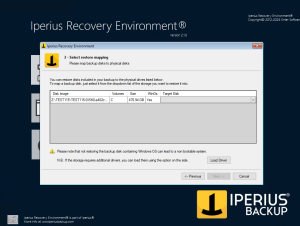
Select the hard drive for the .vhdx file to restore, then click the drop-down menu in the “Target Disk” box to choose the destination disk.
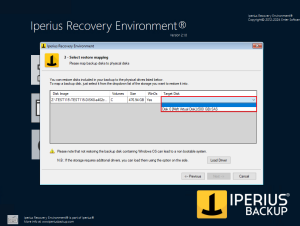
Each VHDX file will be written to the corresponding physical disk we selected. Once the mapping is complete, click “Next.”
4) Confirm the restore settings
In the next window, you can see a summary of the restore mapping (see the image below).
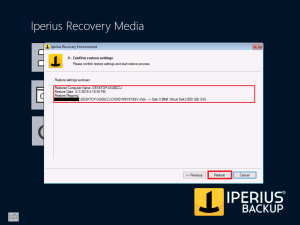
If everything is correct, click “Restore” to start the restore, or click “Previous” to go back and modify some parameters. Clicking “Restore” will start the process, and the disk will be restored (see the image below).
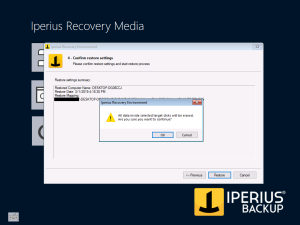
Warning: the restore will irreversibly overwrite the contents of the destination physical disk.
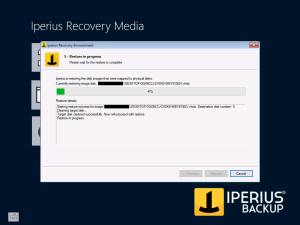
5) Start the restore
The restore process will begin, first formatting and preparing the disk and then writing the image (see the image below).
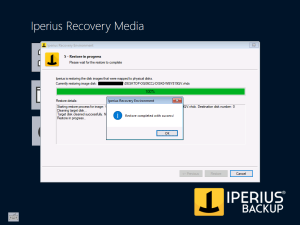
Once the process is complete, click “OK” and then “Finish” to end the procedure.
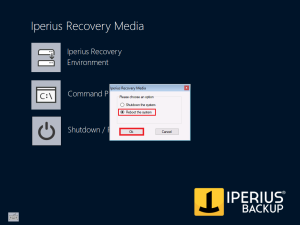
6) Reboot the system
Finally, click the “Shutdown/Reboot” button and select “Reboot.” Remove the USB device or disk from which Iperius Recovery Environment was booted and confirm with “OK.”
The computer will reboot and boot from the restored disk.
For any questions or doubts regarding this tutorial,
Contact us