← All Tutorials
Restore computer from Windows image backup (wbadmin)
Iperius Backup allows you to create a system image to back up Windows. Thanks to the disk image backup, you can restore the entire system in case of failure, disk malfunction, or virus attack.
This type of backup is available in Iperius in two modes:
- Iperius Incremental Disk Image with proprietary CBT technology (recommended, see the related tutorial: Disk Image Backup (Disk Image), P2V, and Disk Cloning with Iperius)
- Automatic system backup with wbadmin / Windows Server Backup
This tutorial will guide you through the process of restoring your computer (bare-metal restore) using an image saved on a local, external, or network disk via the Windows installation disk or a system recovery disk. We are talking about a backup made with wbadmin, i.e., with method 2 mentioned above.
The restoration can also be performed on a computer with different hardware than the one used for the backup (Hardware Independent Restore).
If you do not have the Windows installation disk, you can follow this simple Microsoft guide to create a recovery disk:
https://support.microsoft.com/en-us/windows/recovery-drive-abb4691b-5324-6d4a-8766-73fab304c246
The restore procedure is valid for Windows Vista, Server 2008/R2, Windows 7, Windows 8, Windows 10, Windows 11, Server 2012/R2, Server 2016, Server 2019, Server 2022, and Server 2025. It is essential that the Windows version is the same as the one in the image backup (including whether it is 32-bit or 64-bit).
Note: the new disk must be at least the same size as the source disk from which the system image was made.
Now, let’s see how to proceed with the restoration.
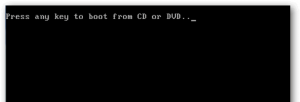
To begin, insert the installation or recovery disk/drive into the computer and boot the computer from it:

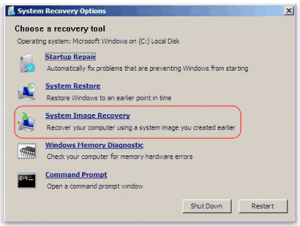
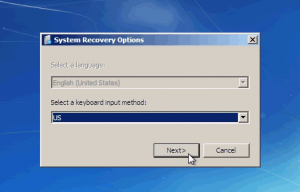
Select the option to restore the system image (System Image Recovery) and the keyboard layout:
The recovery program will search for any Windows installations on the destination disk:
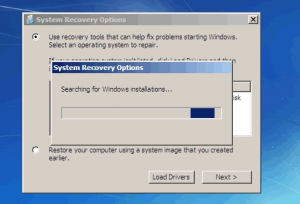
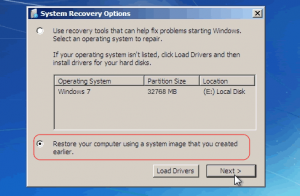
Select the option to restore the computer using a previously saved system image:
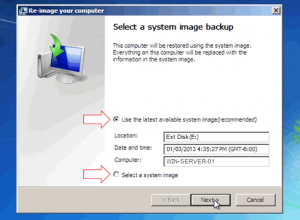
The program will automatically detect any image backups on the connected local disks and select the most recent backup available. You can also manually choose a specific backup by selecting it from a local disk or a network:
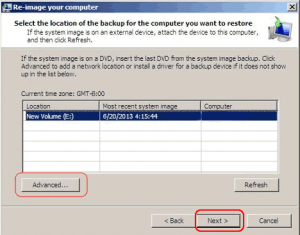
If you selected a specific backup, you will see a list of all available image backups. To select images from a network, click “Advanced.”
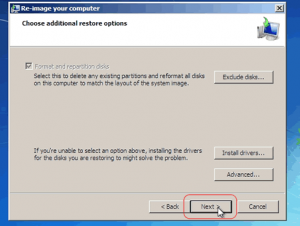
In the next window, you will find additional options: if there are errors during restoration (e.g., if the destination disk is a RAID unit), you can install the necessary drivers using the dedicated button. The only requirement is that the destination disk has the same or greater capacity than the source disk, regardless of the image size.
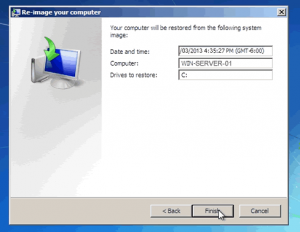
In the final window, the program will show a summary of the selected options.
Click “Finish” to proceed with restoring the image to the disk.
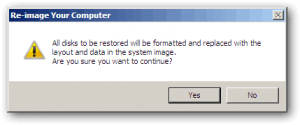
The program will ask for confirmation before proceeding, as this operation will erase all data on the destination disk and replace it with the selected image.
During the restoration, the progress window will be displayed:
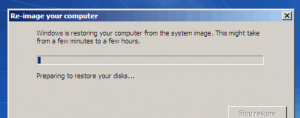
Once the restoration is complete, the computer will reboot, and you will have the system fully reinstalled, exactly as it was at the time of the image backup, with all programs and settings correctly restored.
For any questions or doubts regarding this tutorial,
Contact us