← All Tutorials
Backup on Aruba Cloud Object Storage (S3) with Iperius
The Cloud Object Storage by Aruba Cloud is an ideal solution for online file backup, compatible with the S3 protocol. It is a secure storage solution, perfect for long-term backups or for distributing and synchronizing files across multiple locations or with different clients.
Based on the secure HTTPS protocol (with FTPS support), the service allows access to files from any device, whether it’s a computer, tablet, or smartphone. Like other cloud storage services, Aruba’s Object Storage greatly simplifies the creation of a remote backup solution on an advanced and replicated datacenter infrastructure located in Italy. This important feature, combined with the security of the protocols and the AES 256-bit client-side encryption of Iperius, ensures backups that comply with the latest data protection regulations, such as GDPR.
In this tutorial, we will explore how to easily set up file and folder backups using Aruba’s Cloud Object Storage with Iperius Backup. Iperius allows you to perform online backups to any S3-compatible storage. Not only can we transfer files and folders, but we can also back up ESXi or Hyper-V virtual machines, SQL Server or MySQL databases, and Microsoft 365, all in an automated and secure manner.
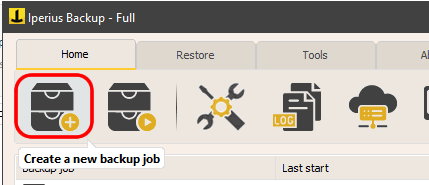
Let’s begin with the backup configuration.
First, create a new backup operation and select the folders to transfer:

Add all the folders you want to back up. You can also configure backups for email (such as Outlook), virtual machines, disk images, databases, or Microsoft 365 organizations.
You must already have a storage plan activated on the Aruba Cloud platform, as well as the access credentials. Creating a storage account is very simple, as described in this tutorial: https://kb.arubacloud.com/en/storage/object-storage/storage-account/creating-a-storage-account.aspx.
Now, go to the next panel (“Destinations”), where you will need to add a destination to Aruba’s Cloud Object Storage.
Add a generic S3 account and enter the credentials generated by the Aruba Cloud platform:
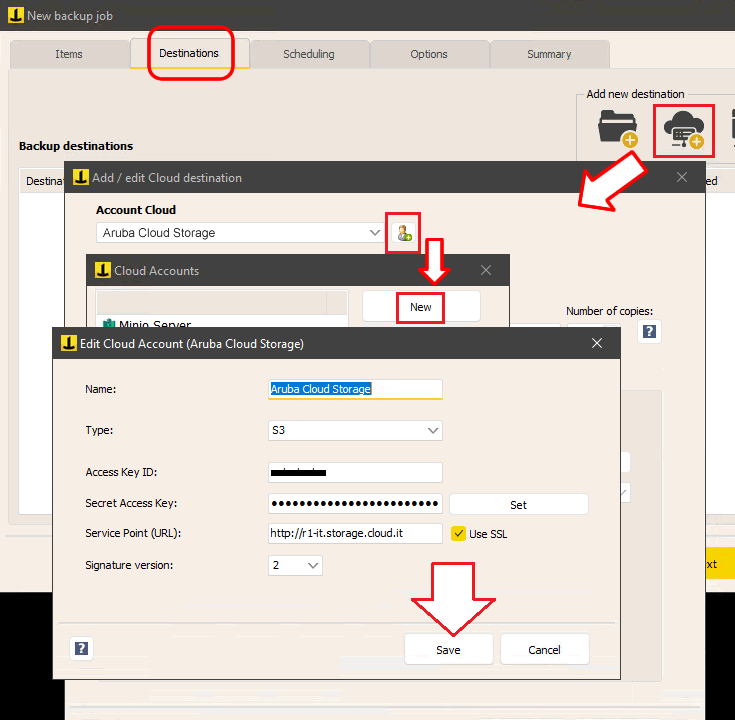
As shown in the previous figure, add an account by clicking the highlighted button. Then, from the list of accounts, select “New.” Assign a name to the account, select “S3” as the type, and enter the access URL (Service Point URL), username, and password provided by Aruba. Don’t forget to enable SSL and set the Signature version to 2.
Click “Save” to complete the addition of the account to the list.
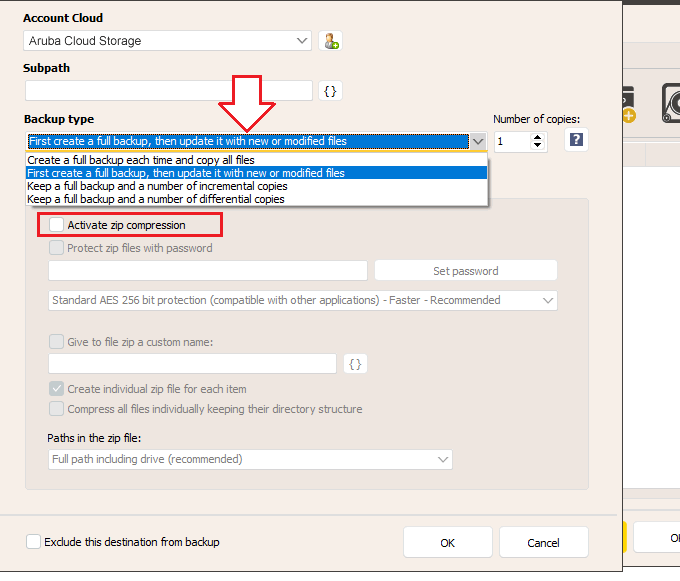
Once the account is created successfully, you can define the backup type (full, incremental, or differential), the number of copies to keep, compression, AES encryption with a password, bandwidth limiting, and various other options.
Finally, you can configure the backup scheduling, email notifications, and other advanced options, then save the operation with a custom name and start the backup immediately.
Finally, assign a name to the operation and click “OK” to complete the configuration.
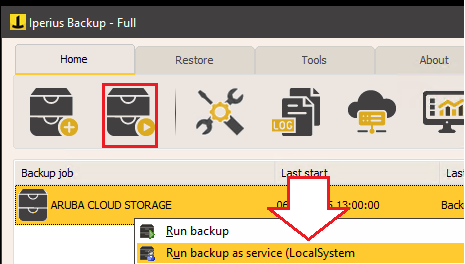
At this point, you can immediately run the backup you just configured.
Iperius will quickly transfer the files to the cloud, with complete security and efficiency. With Aruba Cloud Storage, you can get a protected online space to store your data, safe from threats like ransomware viruses, theft, and natural disasters. Iperius Backup enhances this infrastructure with great configuration flexibility and high security. In fact, as already mentioned, the transfer is absolutely secure thanks to HTTPS and the possibility of AES 256-bit client-side encryption.
Finally, Iperius offers integrated ransomware protection, which can be enabled from the general settings, protecting the backups from unwanted overwrites in case of a system compromise.
Restoring files is simple, either by using the built-in Iperius functionality or via the web interface accessible at: https://webstorage.cloud.it/Account/Login?changeCulture=en
For any questions or doubts regarding this tutorial,
Contact us