← All Tutorials
Hyper-V Backup with Iperius – Incremental and Differential with RCT
Iperius Backup is a powerful, flexible, and lightweight solution for protecting Hyper-V environments. It allows you to easily configure the backup of Microsoft Hyper-V virtual machines, including incremental and differential RCT modes. Backup can be performed to multiple destinations, including NAS, Tape LTO, Cloud services like Amazon S3, Azure Storage, or Google Drive, or FTPS servers. Additionally, with Iperius, there is no limit to the number of virtual machines you can protect with a single license/installation.
Main features of Iperius for Hyper-V backup:
- Automated backup and restore of Hyper-V VMs with RCT support (incremental and differential) at the block level
- Full support for Hyper-V Failover Cluster
- Automatic restore even over the network and to different hosts
- Competitive cost with a perpetual license and free updates
- Restore single files within virtual machines
- Extremely light and stable software, ideal for professional environments
- Intuitive configuration with automatic backup scheduling
- Use of Microsoft standard formats (VHD/VHDX) to ensure always recoverable backups
- Compatible with all versions of Hyper-V, including Windows 11 and Server 2025
- Incremental block-level backup with application log truncation
- Ability to save individual files from virtual machines
- Selective exclusion of disks or virtual machines
- A single license for unlimited virtual machine backups and management of multiple Hyper-V servers without the need for agents
- Support for multiple destinations, including Tape LTO, NAS, FTP, Cloud (Google Drive, Dropbox, Amazon S3, Azure, OneDrive, etc.)
- A comprehensive tool with many additional features, including support for VMware ESXi and ESXi Free backups
Note: To perform backups with RCT and block-level image mode, Iperius Backup must be installed directly on the Hyper-V host. Some configurations may require a hypervisor license.
How to backup Hyper-V with Iperius – quick guide
After installing and launching Iperius, follow these simple steps to configure a backup:
1. Creating a new backup job

2. Adding a Hyper-V item
The first step is to create a connection account to the Hyper-V server (local host). Just enter the IP or machine name and the credentials of an administrator user.
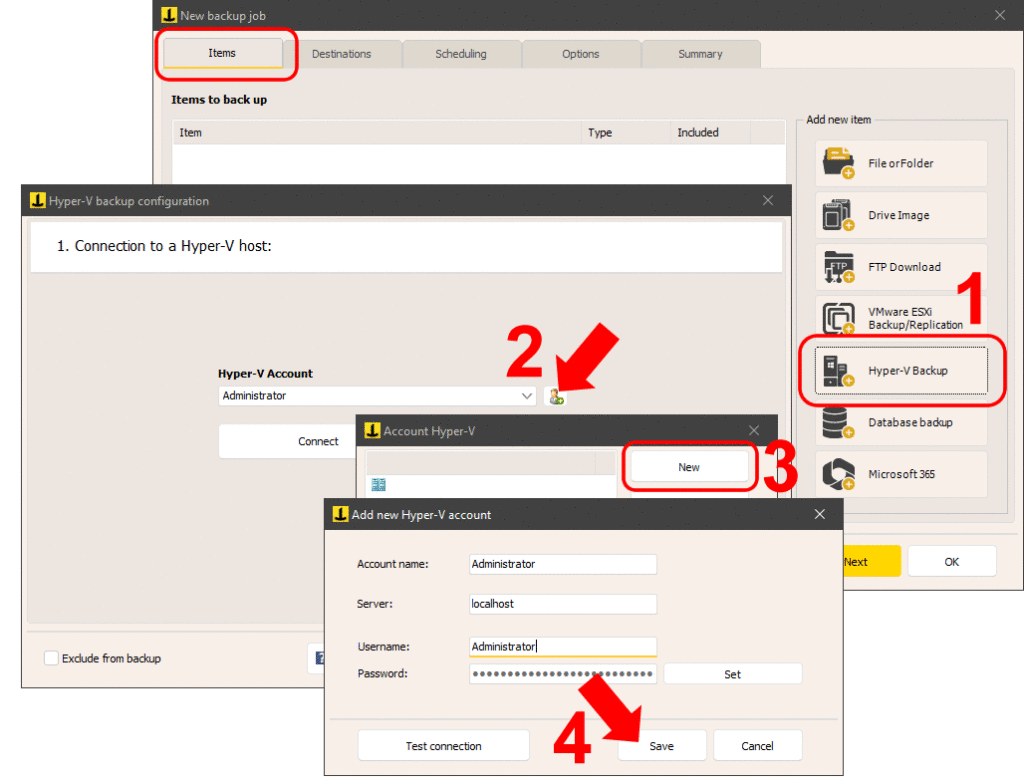
As shown in the image above, add a Hyper-V backup item, then add a connection account and test the connection using the appropriate button. Finally, save the account.
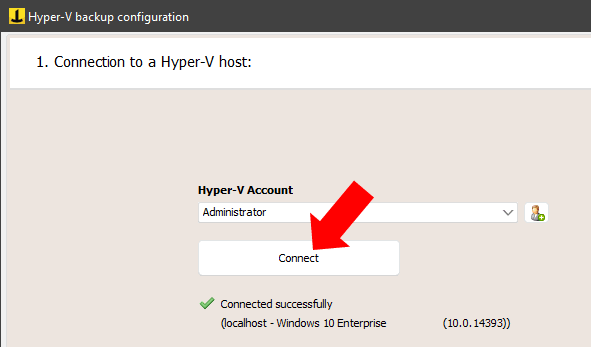
3. Connecting and selecting the virtual machines to back upSelect the account you just created and connect. Click the “Next” button to see the list of virtual machines.
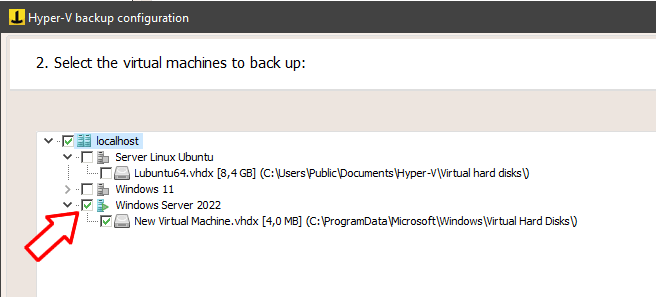
As you can see in the image, you can easily select the virtual machines to back up, even excluding specific disks if the virtual machine has multiple disks.
4. Choosing the backup mode
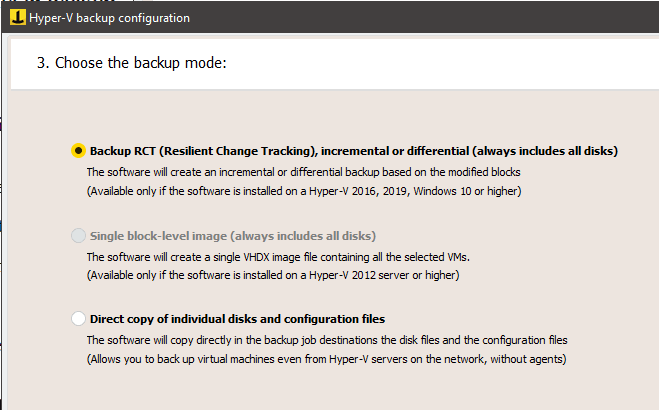
Iperius offers three backup modes for Hyper-V:
- RCT Backup (Resilient Change Tracking): Incremental and differential backup with only modified blocks being saved. This is the most modern and advanced mode and thus the recommended one (available from Server 2016 / Windows 10 onwards)
- Block-level image backup: Creation of a single image file (VHDX) that can be incrementally updated (using Windows Server Backup)
- Direct copy of VM files: Hot copy of VHD/VHDX files and virtual machine configuration files, even over the network. In this mode, you can also pause the VM before the backup and restart it after the backup is complete.
5. Configuring RCT backup
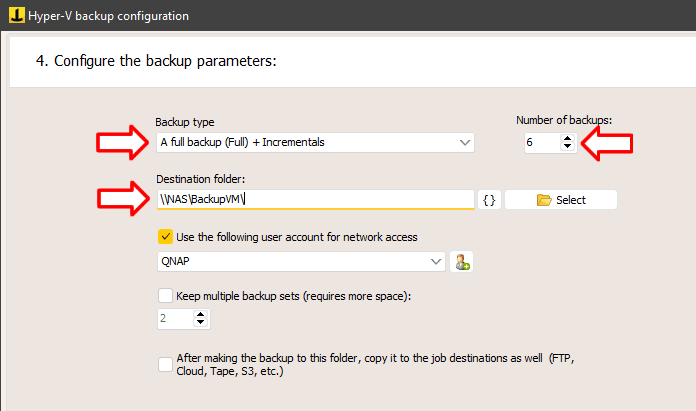
Configuring RCT backup is very simple. We can choose between Full, Incremental, or Differential backup types, and specify the number of incremental and differential copies to retain (for example, if we choose 6 copies and schedule this operation to run daily, we will have a weekly backup set with 1 full backup and 6 incrementals).
Choose the destination folder, which can be local or over the LAN (e.g., on a NAS).
You can specify a network authentication account if needed, keep multiple backup sets that are updated in rotation (so, by selecting number 2, you will have 2 full backups and 12 incrementals in the example we’re discussing).
The last option, if enabled, will copy the RCT backup to other destinations specified in the backup operation (under the “Destinations” panel).
Proceed to the summary by clicking “Next” and then save the Hyper-V backup item by clicking “OK.”

5. Adding additional destinations
If you are using the “Direct Copy” mode, you will need to specify at least one destination in the “Destinations” panel of the job.
However, if you have selected the RCT or Drive Image mode, the items will already contain a primary destination. Adding one or more additional destinations in this panel is optional (for example, it can be used to copy an RCT backup to a cloud destination, like Amazon S3 or Azure Storage).
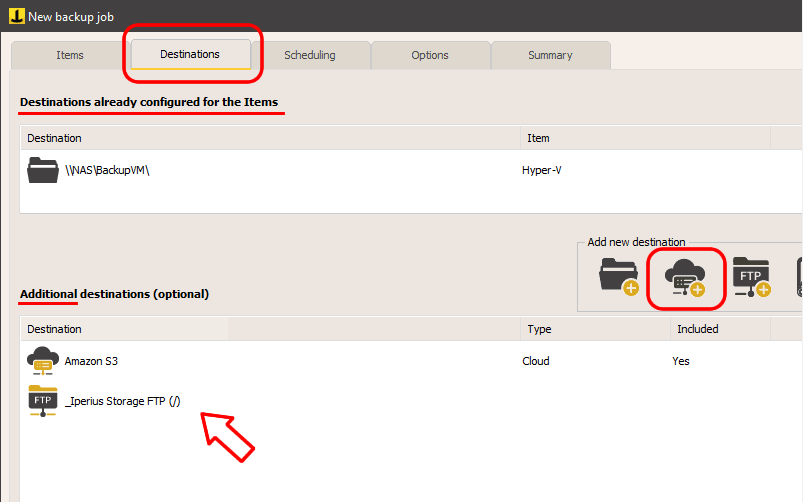
As shown in the image, destinations can be multiple and of various types.
6. Other backup job configurations
In the next two panels of the backup job, you can configure scheduling (when to run the automatic backup) and other additional options, such as sending an email notification when the backup is complete.
In the final panel, you need to specify the name of the backup job and save it by clicking “OK.”
Once the job is saved, you can immediately run the backup.
Restoring a Hyper-V virtual machine backup
To perform a full restore of a Hyper-V virtual machine, follow this tutorial:
Hyper-V VM Restore with Iperius
To restore single files from a Hyper-V backup, check this guide:
Restore single files
Note: Iperius uses Microsoft standard formats (VHD/VHDX) whenever technically possible, ensuring that backups can be recovered even without Iperius Backup.
For any questions or doubts regarding this tutorial,
Contact us